30+ Essential Linux Commands You Need To Know

Almost everything has a beautiful user interface these days. Just point and click to get things done. So we almost never need the command line.
But the moment you sign up for a VPS, you need to learn these essential Linux commands, or you’ll be left staring at a black screen, wondering what the heck to do next.
While there are thousands of Linux commands, I’ve filtered down to the 30 most-used commands for day-to-day server management.
Understand Your Current Proficiency With Linux Commands
Depending on how often you use Linux commands, you’ll fall into one of these four proficiency levels.
- Foundation level: You can SSH into your server and navigate directories, but you aren’t comfortable with system changes. You probably copy-paste commands from tutorials without fully understanding what they do. File permissions are still confusing, and when something breaks, you don’t know where to start looking.
- Professional level: You’re comfortable with basic file operations and can troubleshoot simple issues, but complex problems still send you searching for help. You can manage development environments but lack the confidence to optimize performance or implement security measures.
- Infrastructure level: You can diagnose performance bottlenecks and handle security configurations, but automation feels overwhelming. You understand how individual commands work, but aren’t fluent enough yet to combine them into efficient workflows.
- Expert level: You can think systematically about server architecture and can quickly identify the root cause of complex issues. You automate routine tasks and can optimize servers for specific use cases without relying on external resources.
I’ve categorized the Linux commands below, keeping in mind these exact proficiency levels.
Foundation Level: Commands Every Developer Must Master
The first time you SSH into a VPS, you need to know how to navigate around and look at files. These commands help you do that without feeling completely lost.
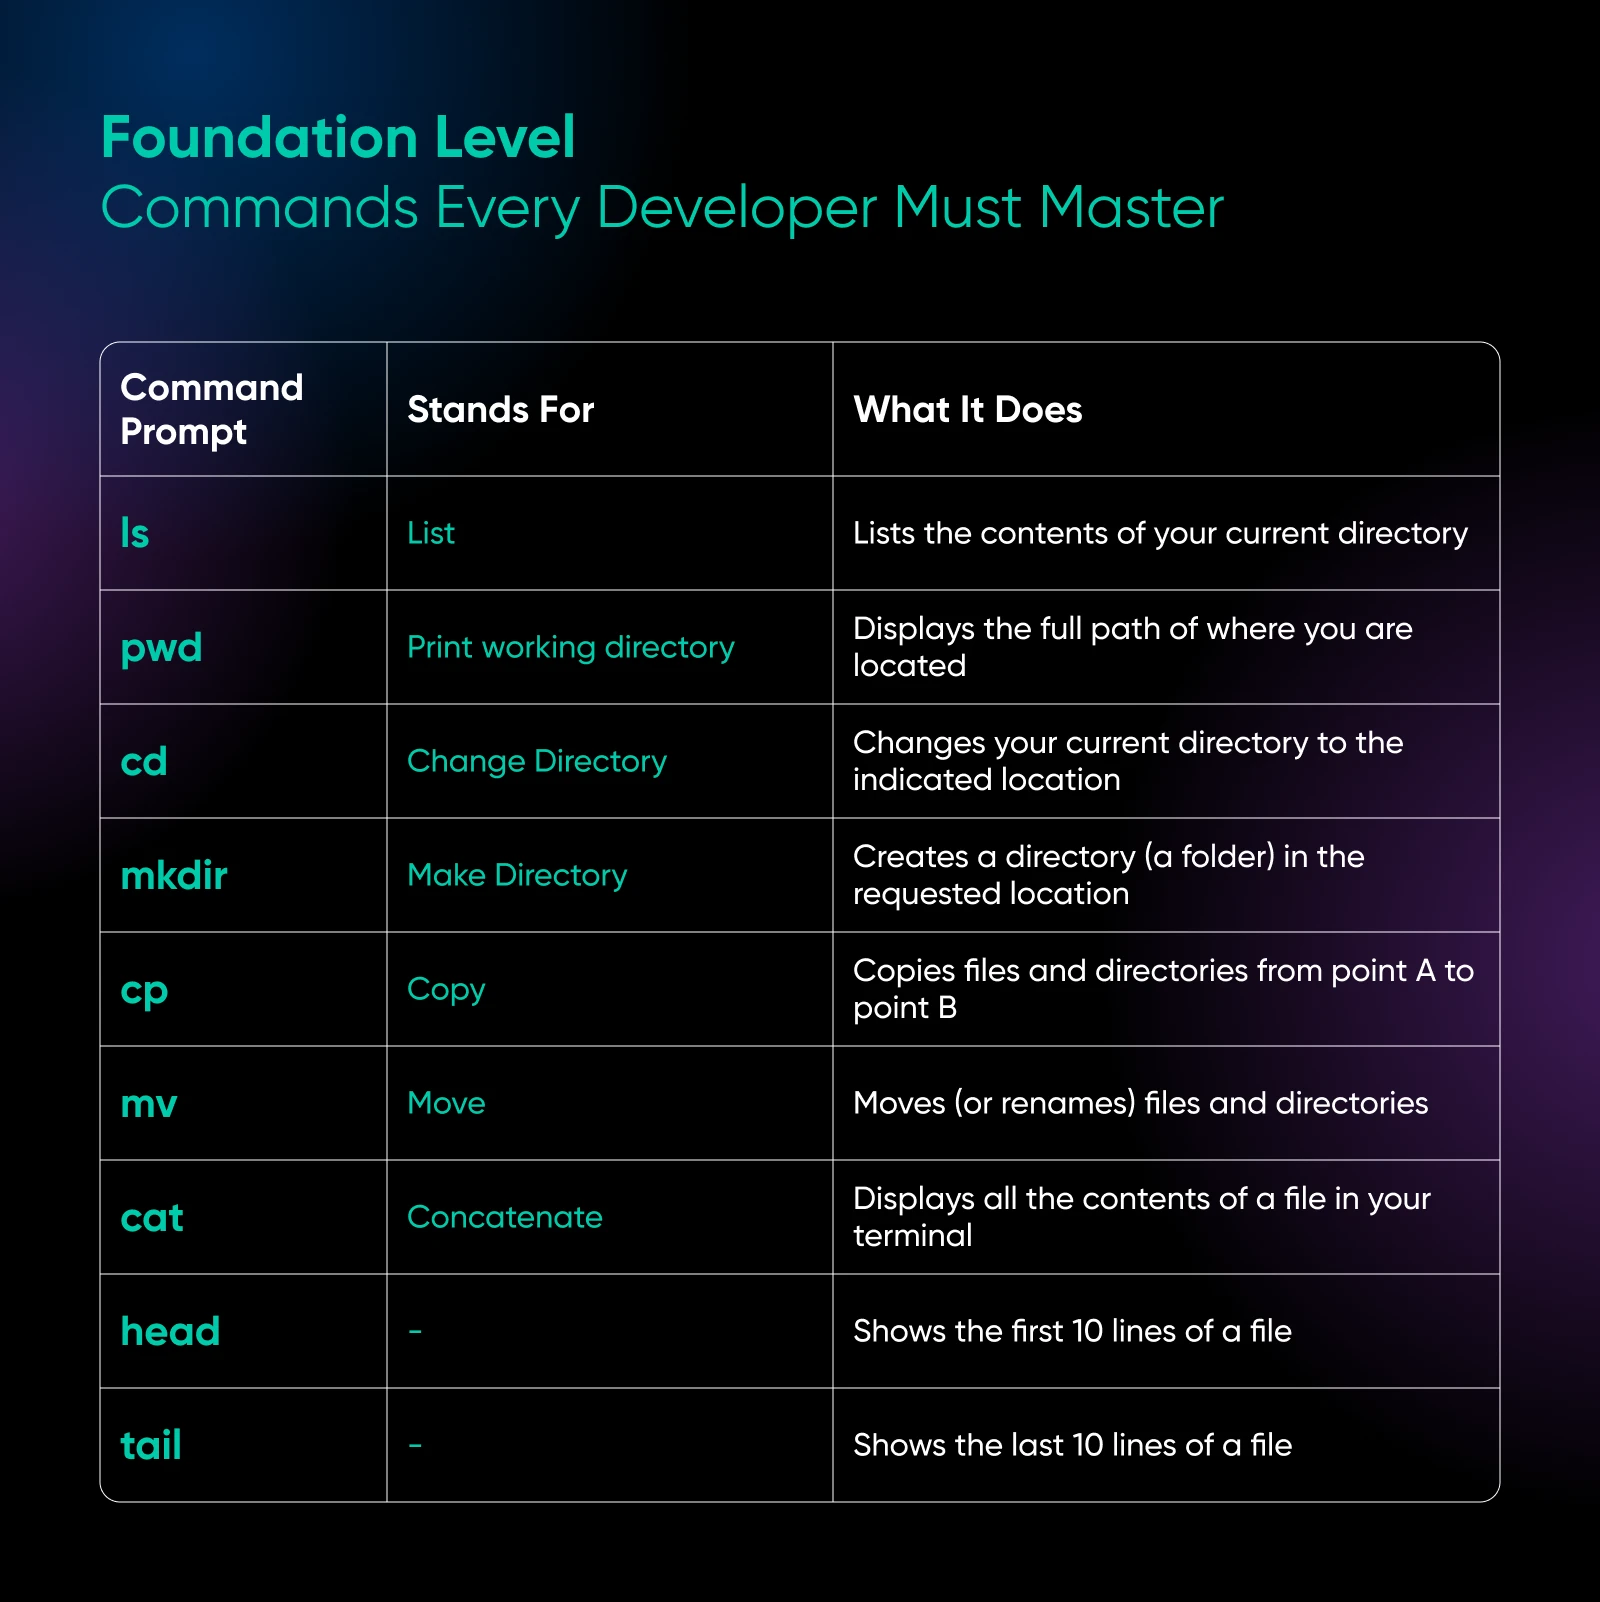
Navigation and File Inspection
1. Is: Shows the contents of your current directory
The command without parameters lists (get it? ls = list!) all visible files and folders in your current location.
But when managing websites, you need more detailed information, so you can use ls -la to see permissions, ownership, file sizes, and hidden files that start with dots.
ls -la /var/www/html
The output shows everything you need:
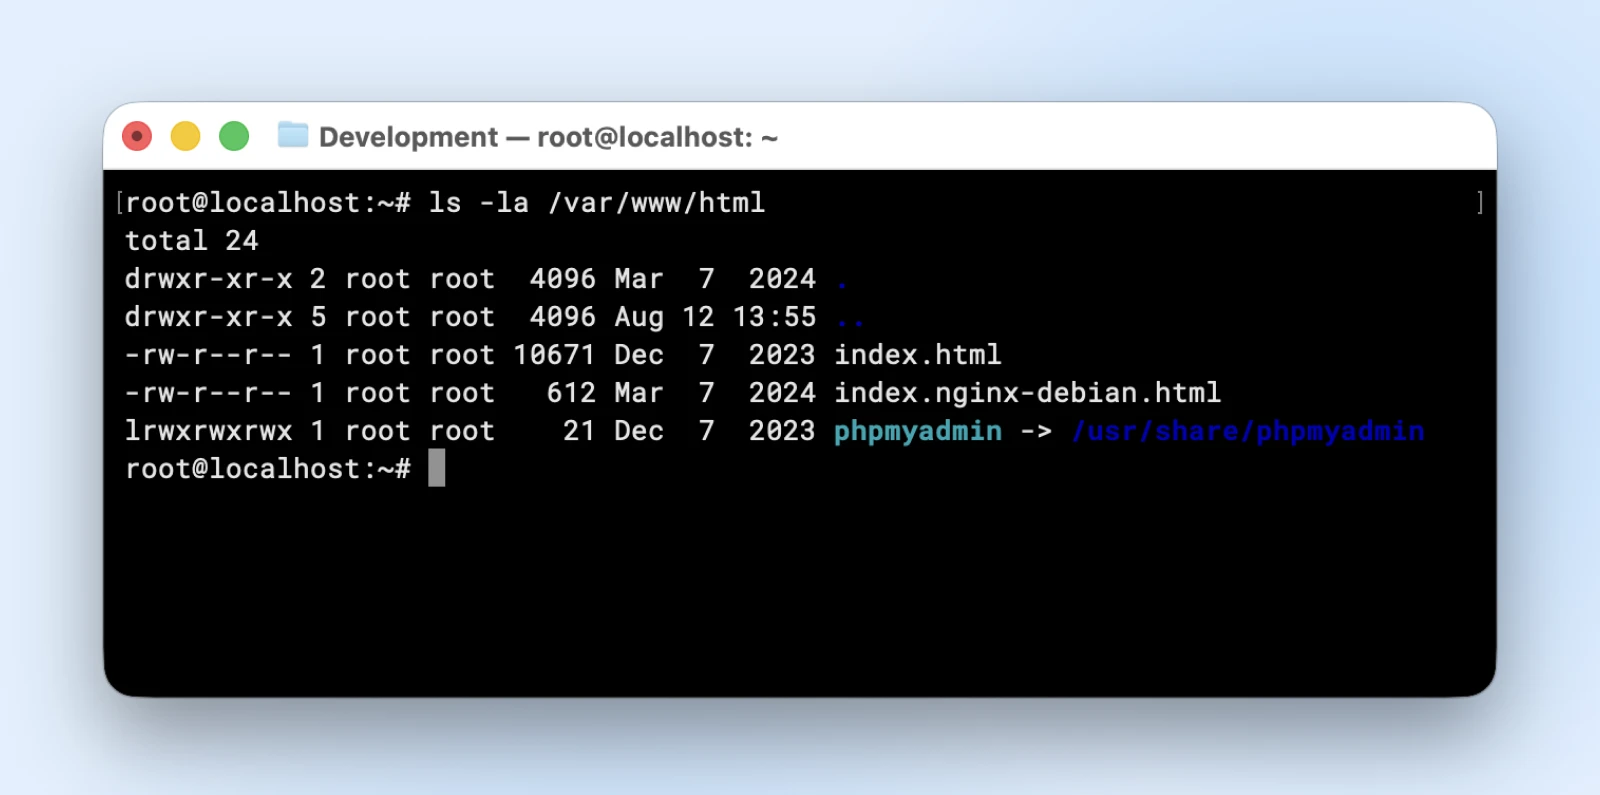
The first column shows file permissions, the third and fourth show who owns the file, and the last shows when it was modified.
The table shows detailed information about all files in your web directory, including hidden configuration files like .htaccess that can cause website issues.
2. pwd: Shows your current location in the directory structure
The command stands for “print working directory” and displays the full path of where you’re currently located. When managing multiple websites on one VPS, this prevents you from accidentally editing the wrong site’s files. Just type in:
pwd
This might return something like /var/www/site1, confirming you’re working in the correct website directory.
3. cd: Change directory, which changes your current directory to a different location
The basic syntax is “cd /path/to/directory.”
You can use shortcuts like “cd” alone to go home, “cd -” to return to your previous directory, and “cd ..” to move up one level.
cd /var/www/html
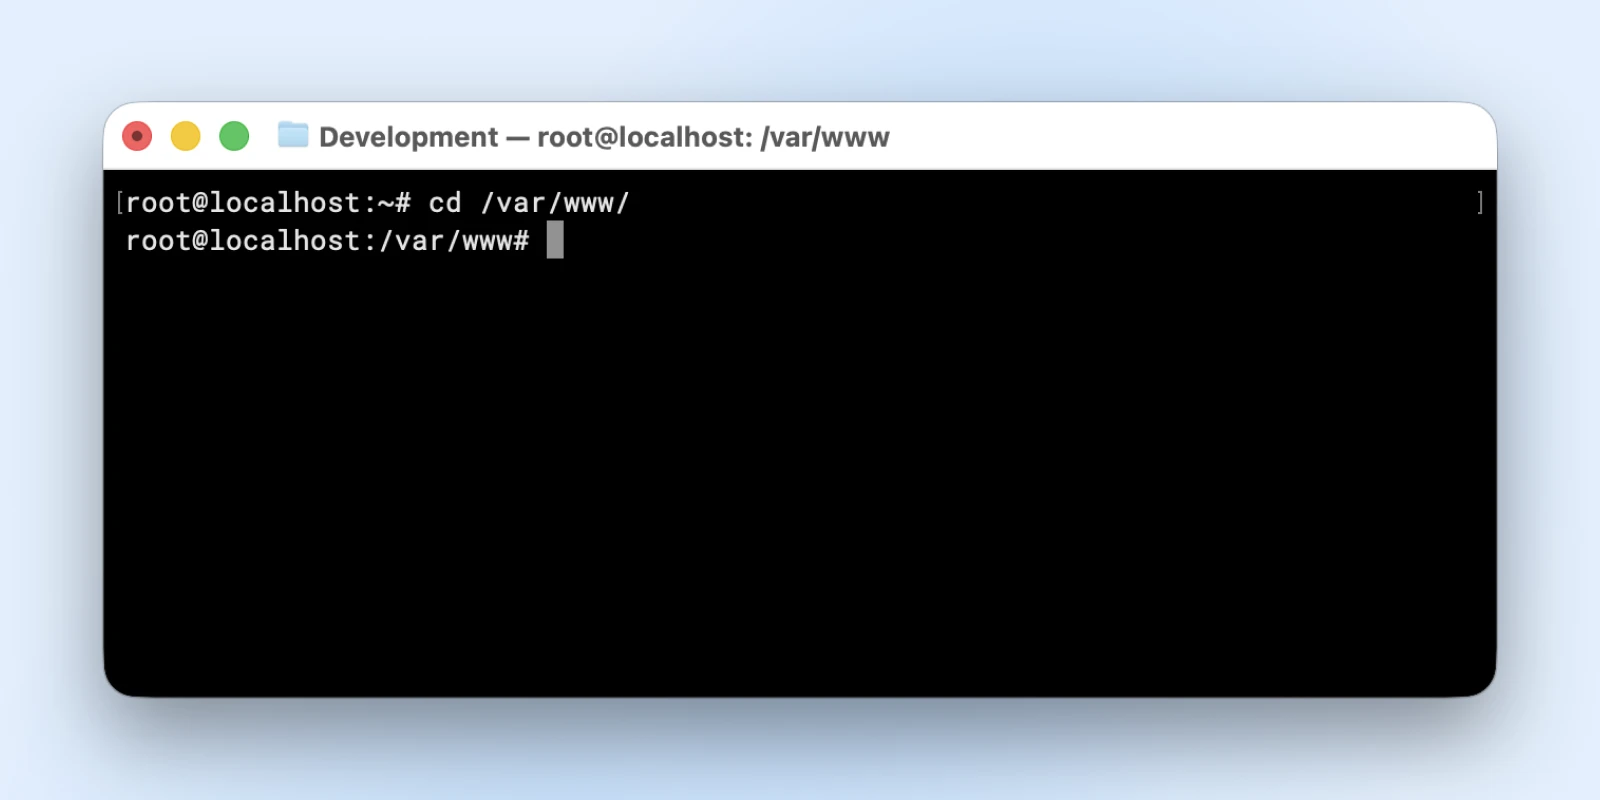
This moves you directly to your website’s main directory, where most files are stored.
File and Directory Management
4. mkdir: Creates new directories
It stands for “Make Directory,” and the basic syntax is “mkdir directory-name” to create a single folder.
You can use “mkdir -p” to create nested directory structures in one command, and it won’t error if directories already exist.
mkdir -p /var/www/newsite/{public,logs,backups,ssl}
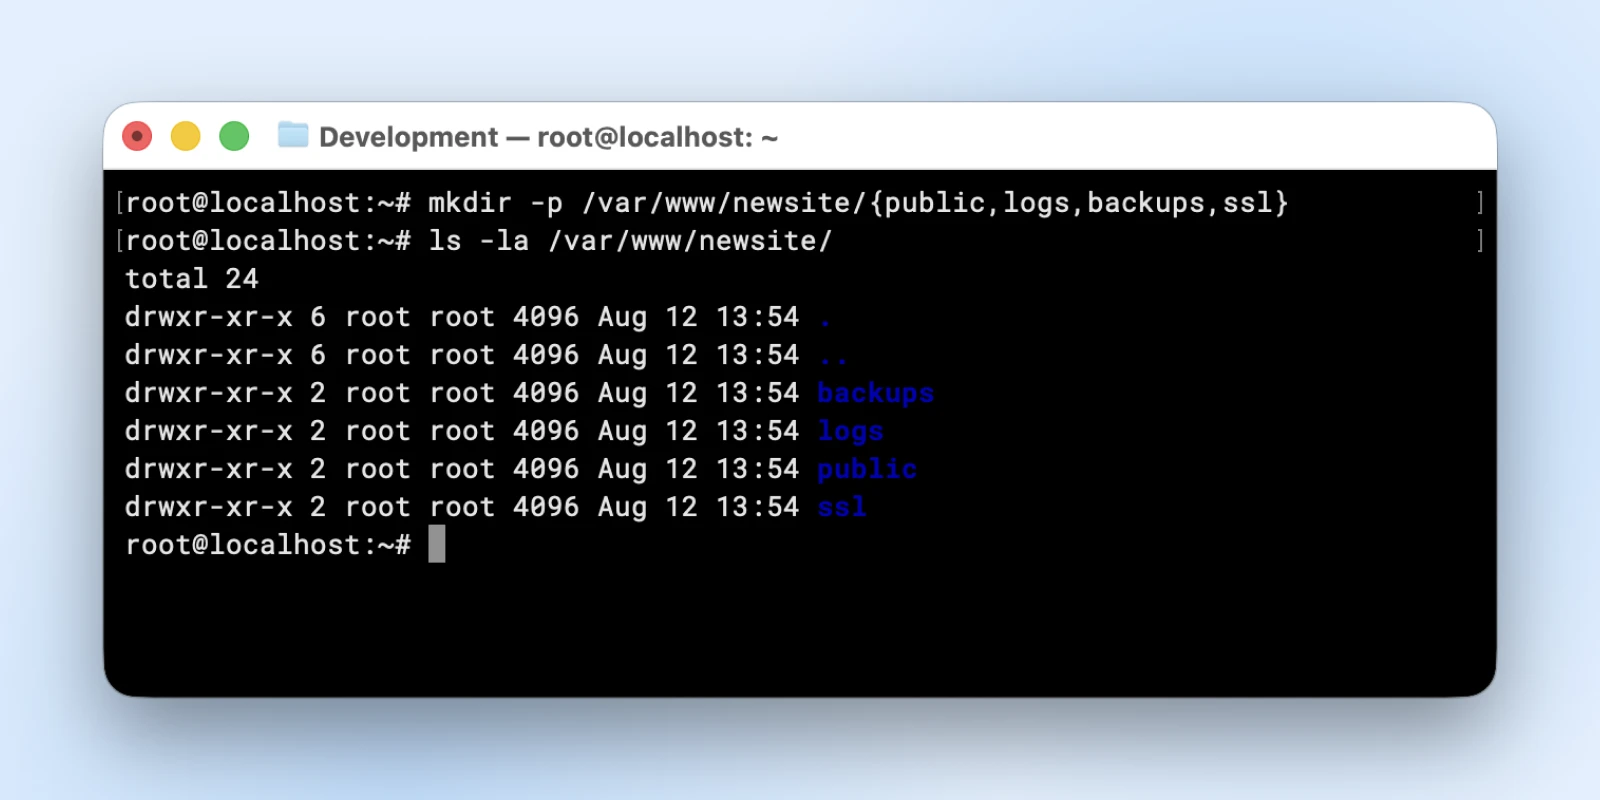
This creates a complete directory structure for a new website with separate folders for public files, logs, backups, and SSL.
5. cp: Copies files and directories from one location to another
The basic syntax is:
cp <source path> <destination path>
However, by default, the cp command does not copy files inside folders or even nested folders.
You’ll need to use “cp -r” to copy entire directory trees recursively, which handles all subdirectories and their contents.
cp -r /var/www/production /var/www/staging
This creates a complete copy of your production website for testing changes before deploying them live.
6. mv: Moves files and directories, or renames them
Unlike copying, this removes the original file, and you can move to different directories or rename files in the same location.
Here’s the basic syntax:
mv <source path> <destination path>
To move the file elsewhere, you need to specify the full destination path as below:
mv wordpress-6.3.2.zip /var/www/downloads/
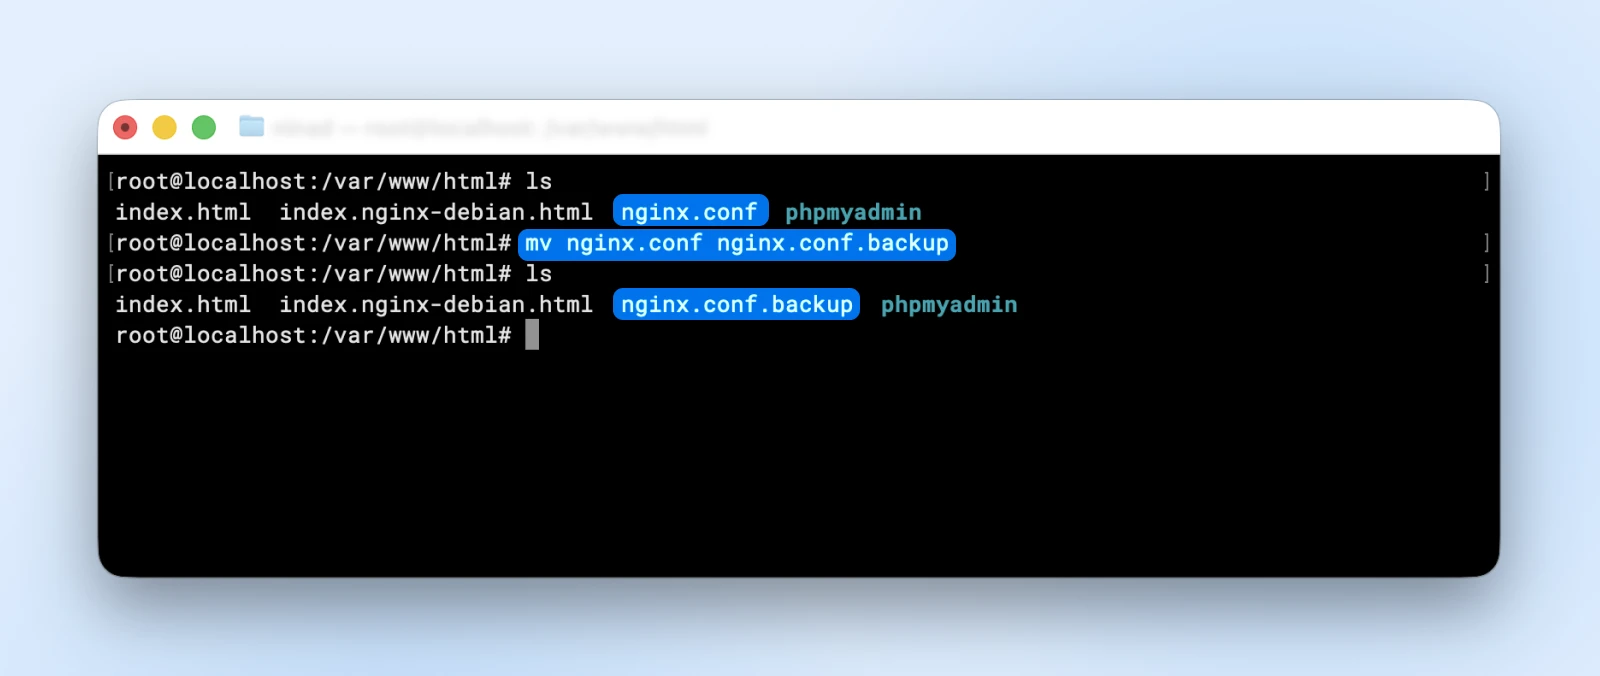
If you want to rename a file, you can just “move” the file from one name to another name in the same directory:
mv nginx.conf nginx.conf.backup
File Content Operations
7. cat: Displays the entire contents of a file in your terminal (Short for concatenate)
The basic syntax is cat filename. This command is perfect for reading short configuration files or checking the contents of scripts without opening a text editor.
cat /var/www/html/wp-config.php
This displays your WordPress configuration file so you can verify database credentials or check for syntax errors.
8. head: Shows the first few lines of a file
The default is 10 lines, but you can specify a different number with “head -n 20.” This is useful for checking large log files without displaying thousands of lines in your terminal.
head -n 50 /var/log/nginx/access.log
This shows the first 50 entries from your web server’s access log to check recent traffic patterns.
9. tail: Shows the last few lines of a file
The tail command without any parameters shows 10 lines, but “tail -f” continuously displays new lines as they’re added to the file. This makes it invaluable for monitoring log files in real-time while troubleshooting.
tail -f /var/log/nginx/error.log
This follows your error log in real-time, showing new error messages immediately as they occur during website operations.
Professional Level: Commands for Managing Development Workflows
Once you know your way around, these professional-level commands give you control over the dynamic parts of your server. You can monitor what’s running, manage processes, and handle system resources like a pro.

Process Control and Monitoring
10. ps: Shows currently running processes on your system
Running “ps aux” displays all processes with detailed information, including CPU and memory usage.
- a shows processes for all users.
- u provides a user-friendly format.
- x includes processes not attached to terminals.
| the “pipe” passes the output from “ps aux” to the “grep” command, and I’ll cover it in the file searching section later.
ps aux | grep nginx
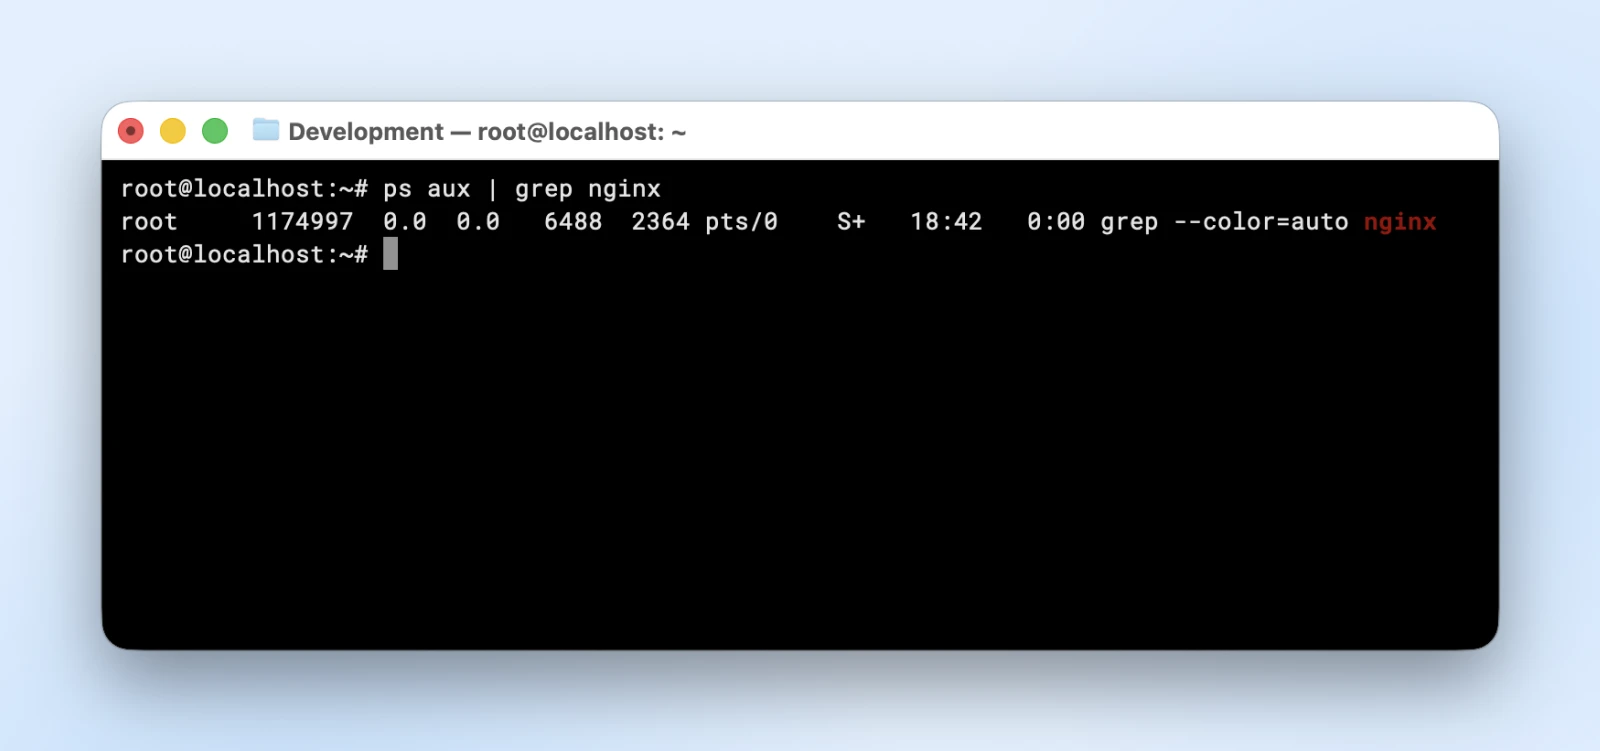
This full command outputs all NGINX-related processes, helping you verify your web server is running and identify any resource-heavy processes.
11. top: Displays real-time system performance and running processes
Unlike “ps,” this command updates continuously, showing live CPU, memory, and process information. Press q to quit, k to kill processes, and M to sort by memory usage.
top
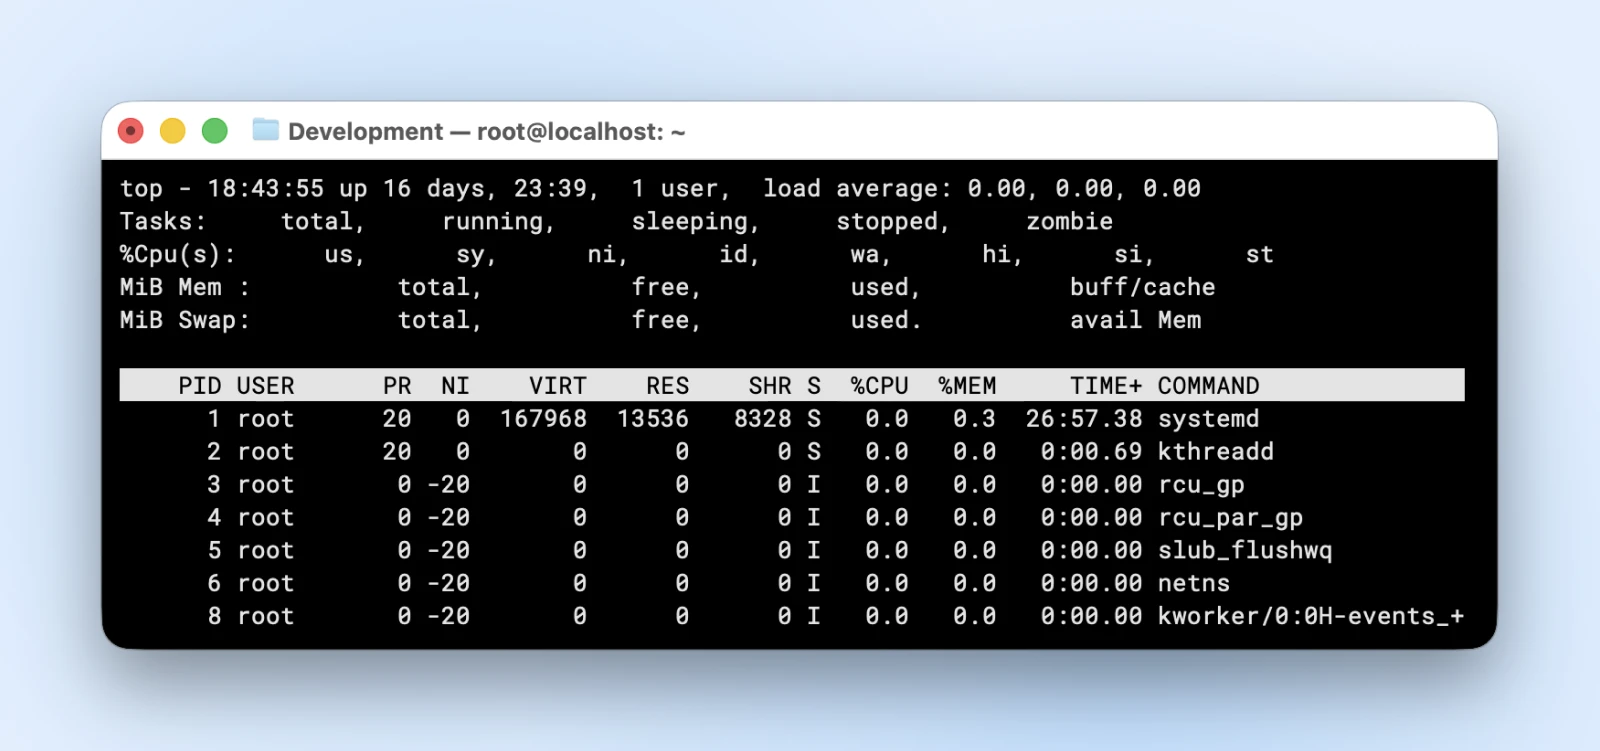
When your website loads slowly, this reveals which processes are consuming resources. The load average and memory usage statistics help identify system bottlenecks.
12. htop: Enhanced version of top with better visual interface
This provides the same functionality as top but with color coding, mouse support, and easier navigation. You may need to install it first with a sudo command, which we cover down below.
htop
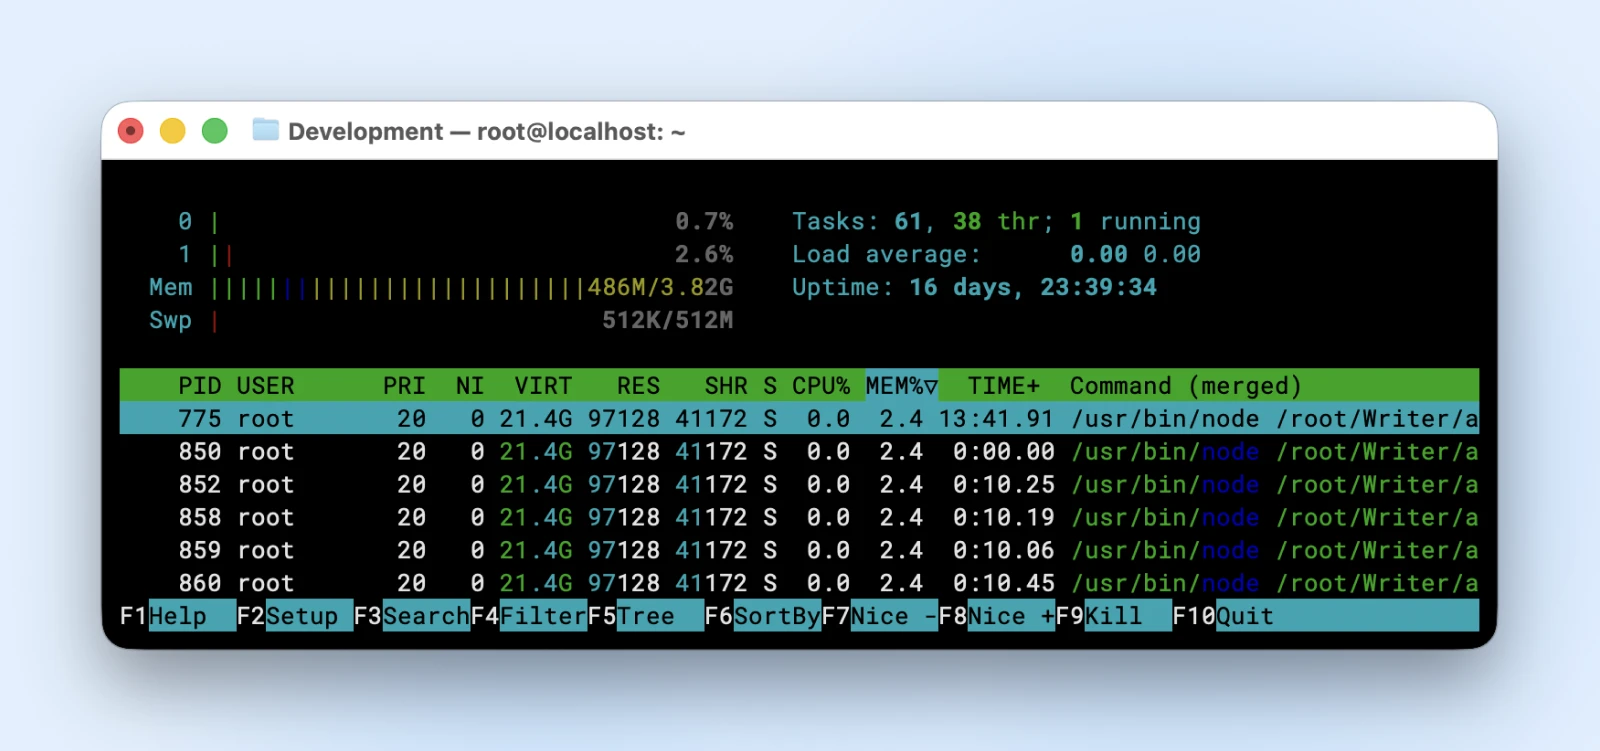
The color-coded display makes it easier to spot problem processes at a glance, and you can scroll through the process list more easily.
13. kill: Terminates processes by their process ID
Use kill <PID> to stop a specific process gracefully. If a process doesn’t respond, you can force termination with kill -9 <PID>.
kill 1234
When a PHP process gets stuck consuming too much CPU, find its PID with ps aux or top, then use kill to terminate it.
14. killall: Terminates all processes with a specific name
You won’t always know the PID since service names can differ from app names. The killall <processname> command stops all processes matching that name at once.
killall php-fpm
This stops all PHP-FPM worker processes — useful when you need to restart your PHP handler completely.
System Resource Monitoring
15. df: Shows disk space usage for all mounted filesystems
Running “df -h” displays disk usage in human-readable format (GB, MB instead of kibibytes). The above command can help you keep track of disk usage so you can avoid disk full errors.
df -h
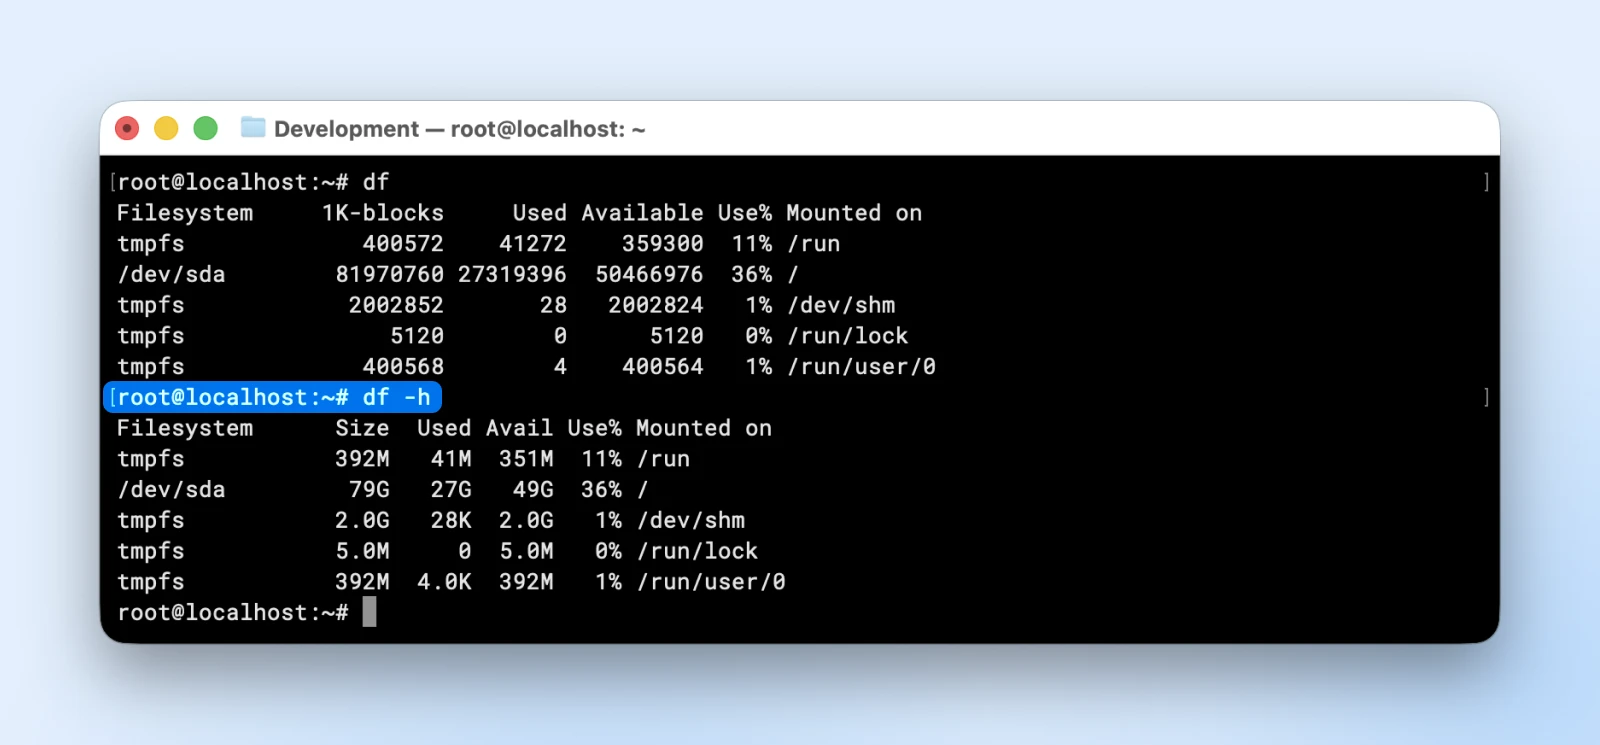
If you see the “use%” column with more than 70% for any disk, it’s time to clean up the disk space or upgrade to larger storage.
16. free: Displays memory usage including RAM and swap space
Without parameters, the free command will provide you data in kibibytes (1 kibibyte is 1024 bytes).
Use “free -h” to see memory statistics in human-readable format. This helps identify memory-related performance issues before they crash your applications.
free -h
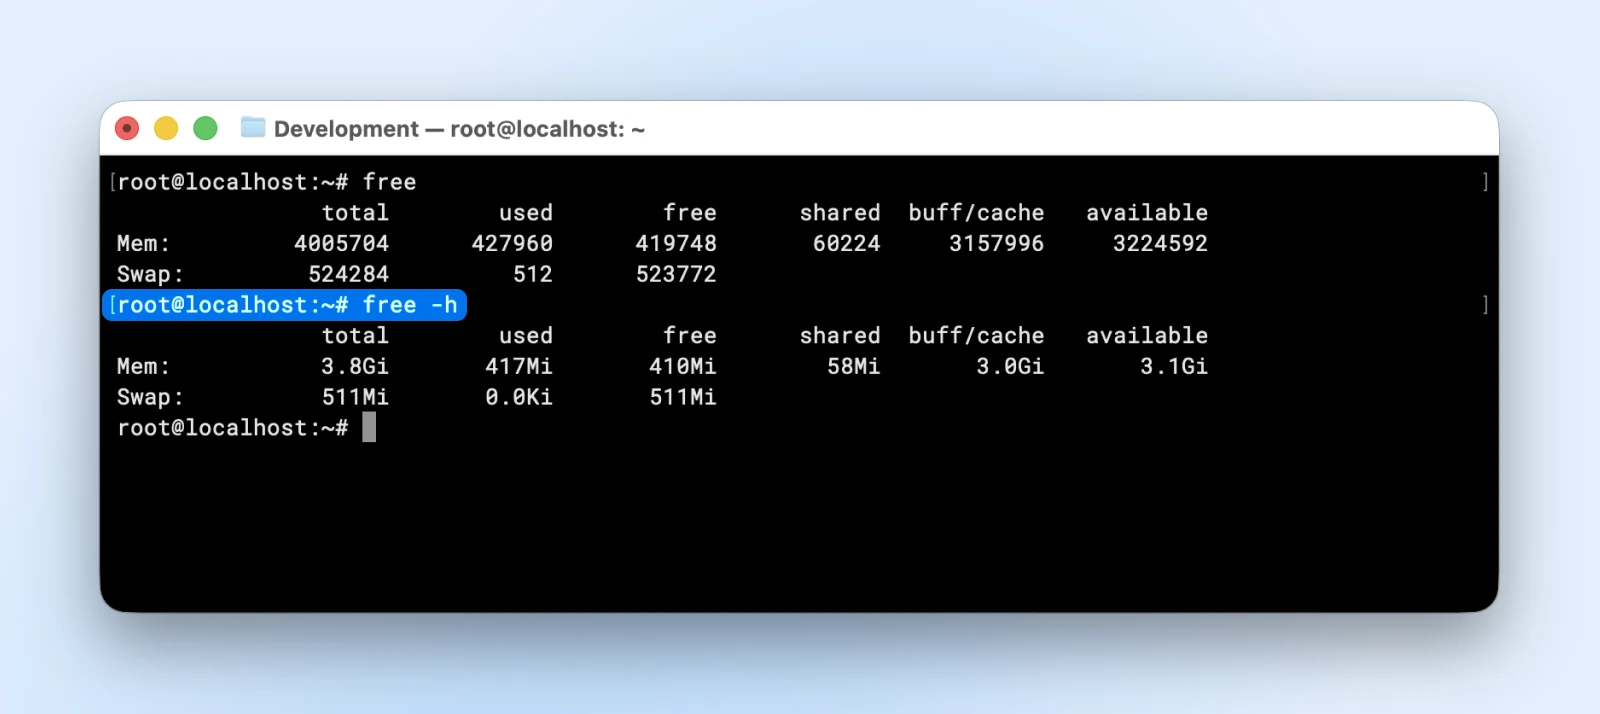
If “available” memory drops near zero, your server will become unresponsive. This indicator tells you when to add more RAM or optimize your applications.
17. du: Shows disk usage for specific directories
Running du -sh <directory> gives you a summary of the space usage for a particular folder. The “-s” gives totals only and the “-h,” as we’ve seen in the commands before, makes the output human-readable.
du -sh /var/www/*
If you’re running multiple websites on your VPS, the above command will show you which website consumes the most space and helps you identify directories that could use cleanup
3. File Searching and Text Processing
18. grep: Searches for text patterns within files
Grep stands for “global regular expression print.” I used the “grep” command with our “ps aux” command before. Let me explain what it actually does.
This command can be used to look up text or regex patterns in large text. Use grep “search term” <filename> to find specific text in a file. Add “-r” to search recursively through directories and “-i” for case-insensitive matching.
grep -r “database_name” /var/www/html/
This finds all files containing your database name, essential for tracking configuration references or troubleshooting connection issues.
19. find: Searches for files and directories based on various criteria
This command helps you find files in your path that match a specific name or pattern.
You can use find <path> -name “pattern” searches for files matching a specific pattern. You can search by name, size, modification time, or file type.
find /var/www -name “*.log” -size +100M
This finds log files larger than 100MB, helping identify files that need rotation or cleanup to free disk space.
20. chmod: Changes file and directory permissions
File permissions on Linux can be complex, and I cannot explain them in detail here, but Red Hat wrote a comprehensive article explaining file permissions.
Once you understand file permissions, you can use the “chmod” command to update them.
Use chmod <permissions> <filename> to set access for the specified filename.
“Permissions,” in this case, use numeric notation where” 7=read+write+execute,” “6=read+write,” “4=read only.”
chmod 644 /var/www/html/wp-config.php
Giving 777 permissions to critical files opens your server to security vulnerabilities.
So you need to be aware of what permissions are absolutely necessary and only provide those. Web files typically need 644 permissions, while website directories need 755 to run correctly.
Infrastructure Level: Commands for Production Environments
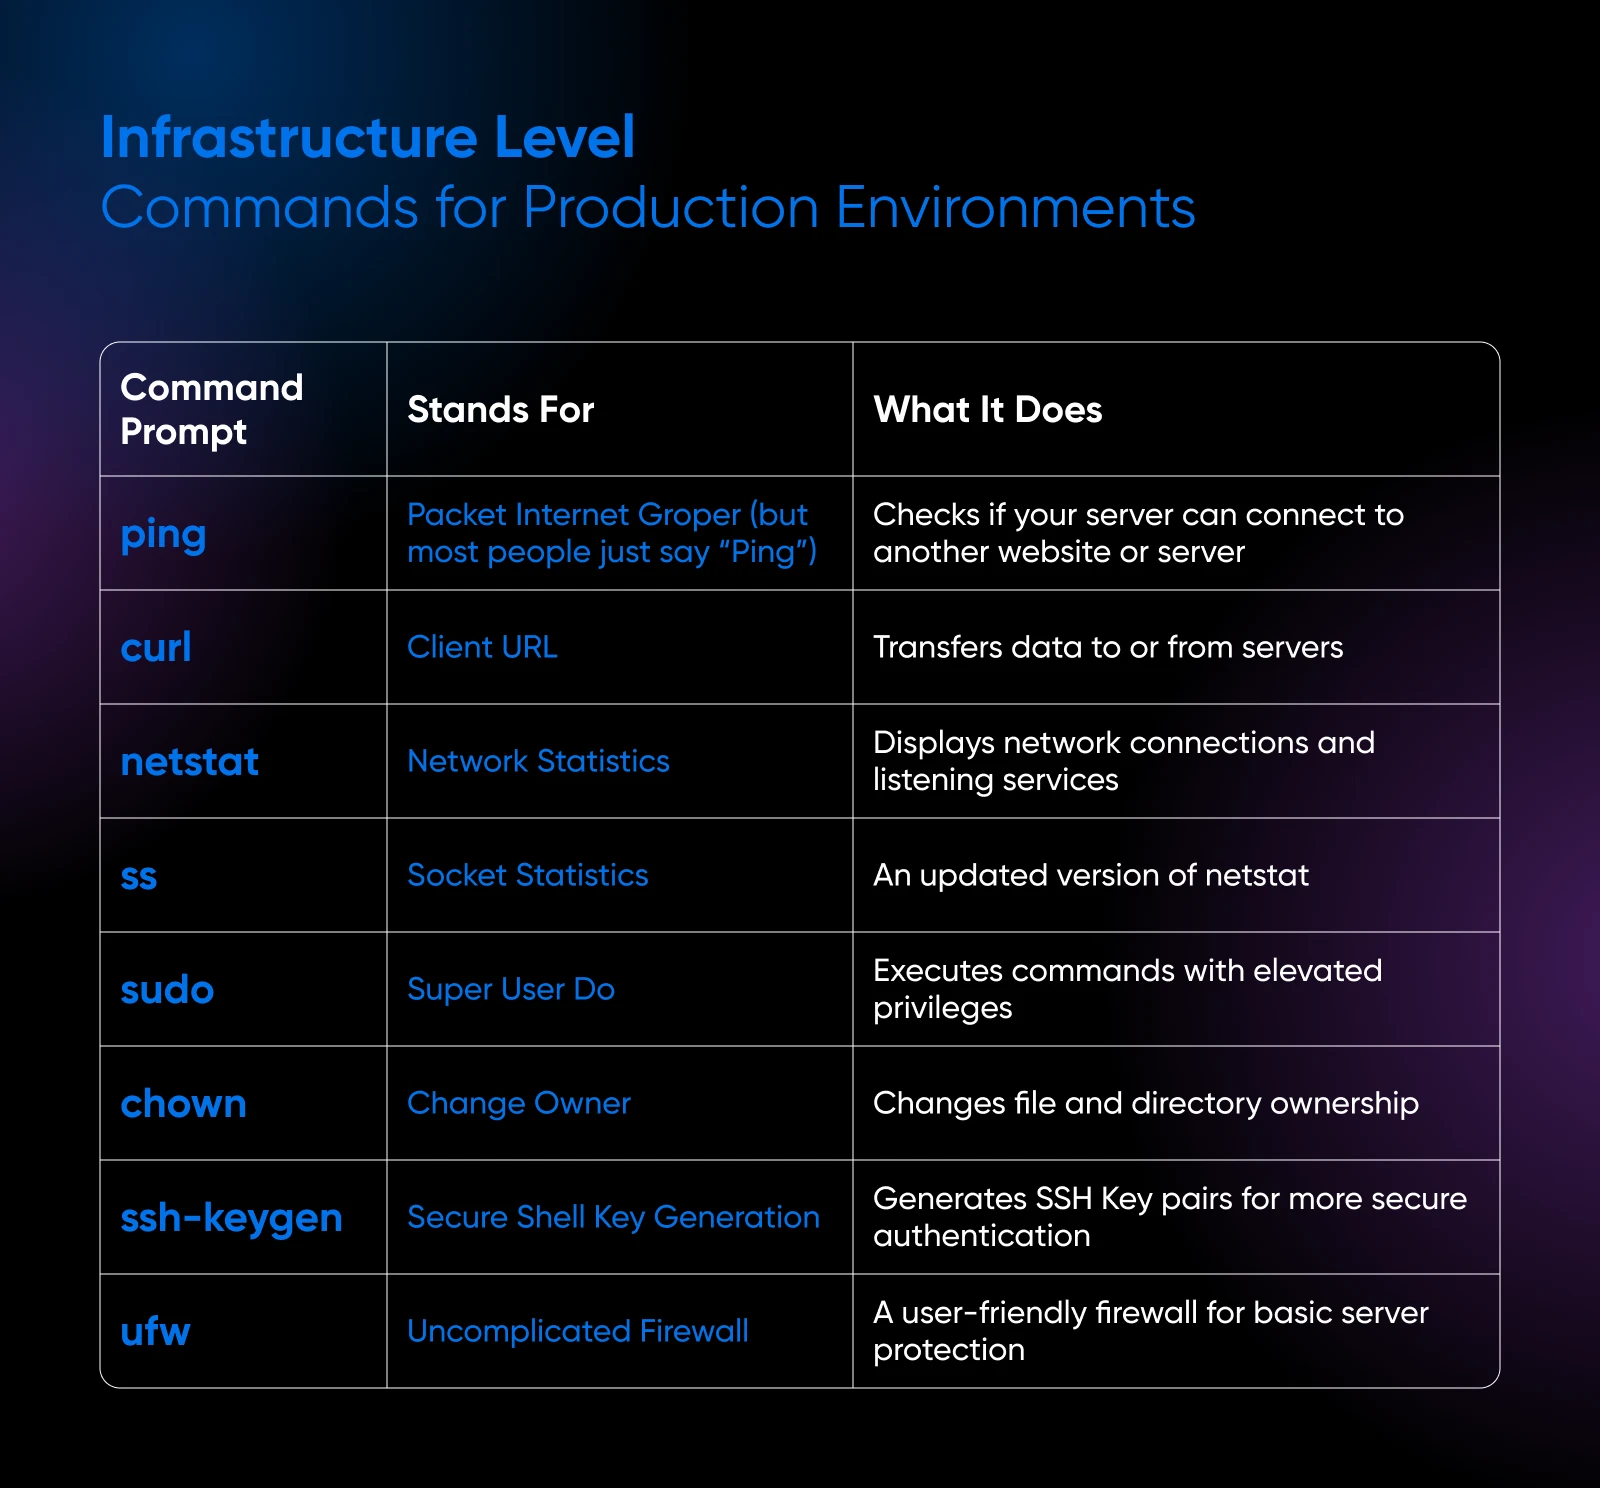
When you’re required to handle the networking aspect of your servers, these commands can quickly separate competent administrators from those who struggle when real issues hit production websites.
Network Diagnostics and Management
21. ping: Tests network connectivity and measures response time
The “ping” command checks if your server can connect to another website or server. You can ping either a domain name or an IP address.
Using just ping <hostname/IP> will create an endless ping until you manually stop it. You can add “-c 4” so the command only sends 4 packets to verify connectivity and stops.
ping -c 4 yourdomain.com
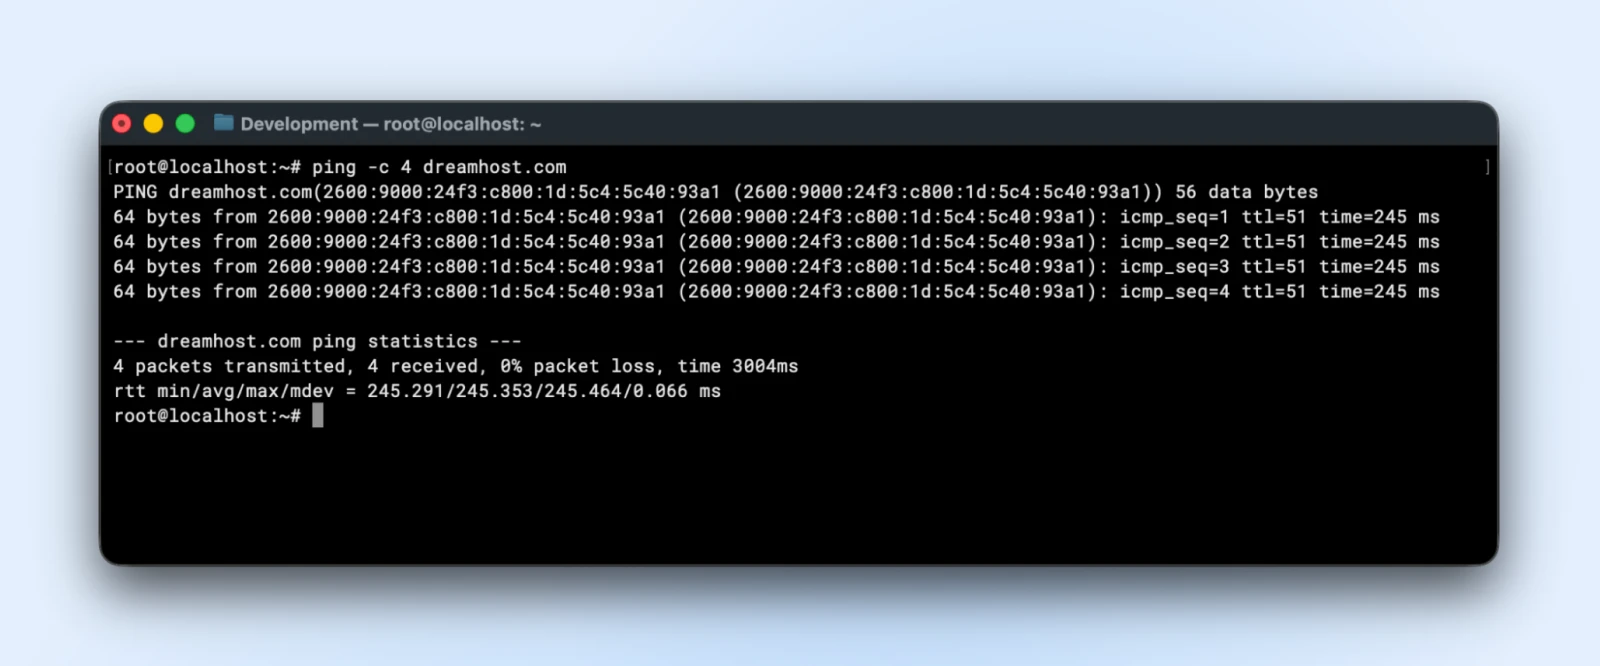
If ping fails entirely, either DNS is broken or there’s a network connectivity issue and you can start narrowing down the issue from here.
22. curl: Transfers data to or from servers using various protocols
When you’re in the terminal, fetching a website and downloading packages is quite difficult. You don’t have a browser or a UI connected.
This command has a variety of parameters, so you may want to go through this official curl usage tutorial to understand it completely.
But for checking if a website is responding, you only need the “-I” (that’s uppercase i) parameter. This parameter helps curl fetch HTTP headers instead of fetching the full HTML from the website.
curl -I https://yourdomain.com
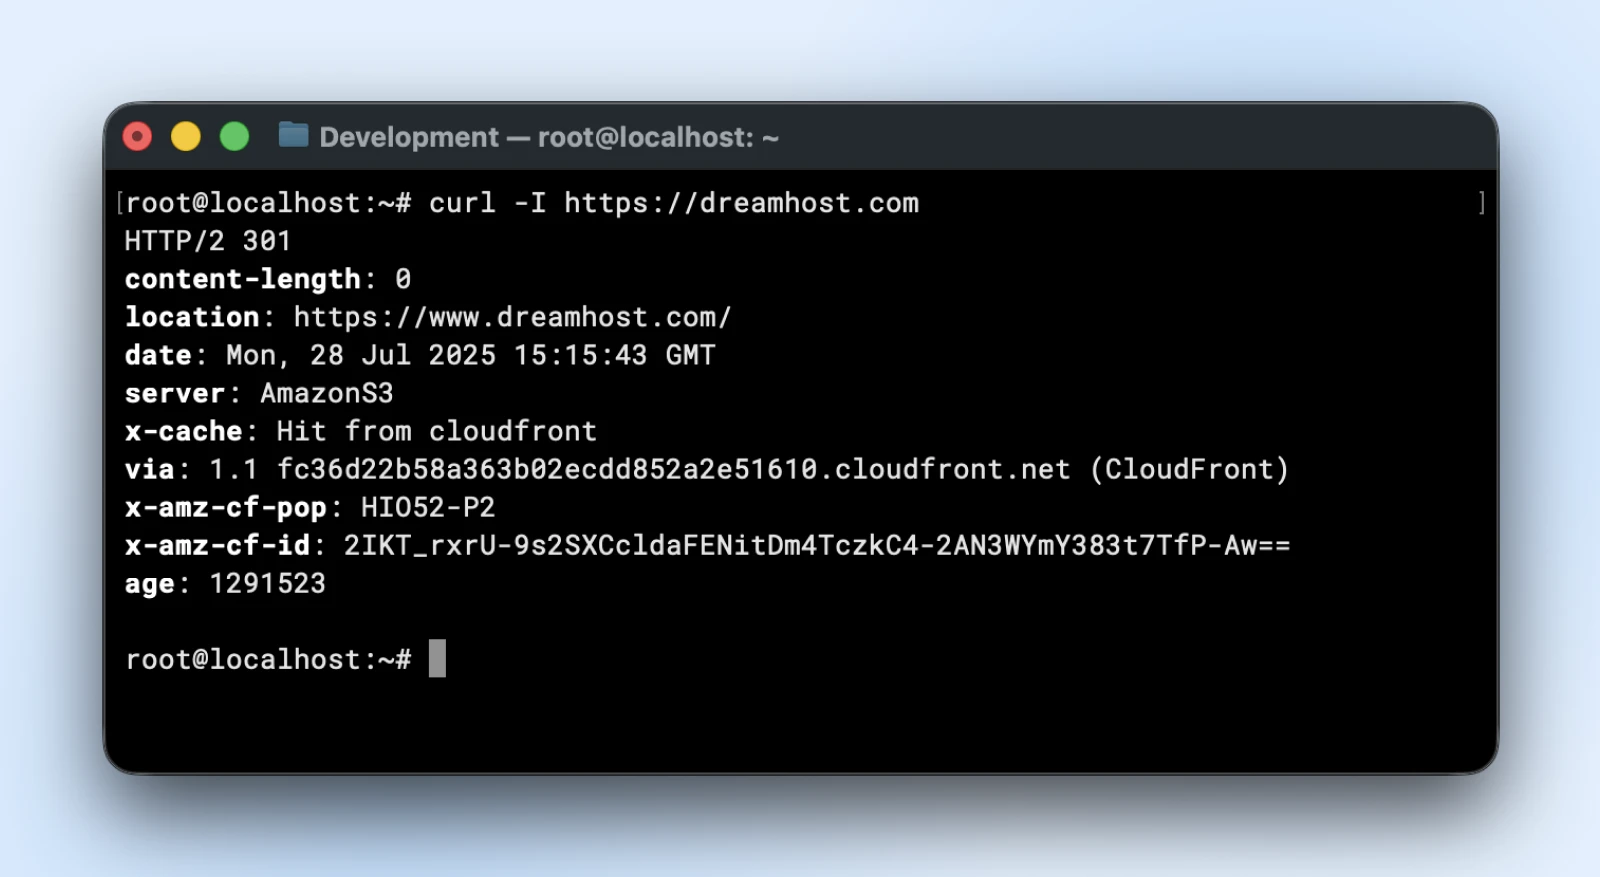
This shows HTTP status codes (“200=success,” “404=not found,” “500=server error”) and response headers, revealing issues browsers might hide.
23. netstat: Shows network connections and listening services
Netstat is yet another extensive command that helps you monitor your network connections, check which ports are open on your server, which services are listening on which specific ports, and a lot more.
Here’s a simple guide from IBM that shows you some common netstat usage.
For server use, you’d mostly need the “netstat -tlnp command” to display listening network connections.
The flags mean:
- “-t” TCP connections
- “-l” listening only
- “-n” numerical addresses
- “-p” process IDs
netstat -tlnp | grep :80
This confirms your web server is listening on port 80. If nothing appears, your web server isn’t running or configured properly.
24. ss: A modern replacement for netstat with better performance
While netstat has been the legacy tool that continues to work, it can be slower if you’re on an extremely busy server. The “ss” command came in to fix that.
You can use similar parameters as netstat with the ss command and receive the output much faster.
ss -tlnp | grep :443
This checks if your web server is listening for SSL connections on port 443, essential for HTTPS websites.
Security and Access Control
25. sudo: Executes commands with elevated privileges
Sudo, short for “super user do,” lets you perform administrative tasks without switching to the root user completely. It helps run commands with accountability and reduced risk.
If you switch to the “root” account, you have full control over your server and can accidentally delete files, including being able to delete the operating system, while it is running.
So, sudo saves us from “suc” accidents. Just prepend the command to any admin command and it will ask you for your password.
sudo systemctl restart nginx
Administrative tasks like restarting services require elevated privileges. Using sudo is safer than logging in as root directly.
Do note that your user needs to have the sudo permissions before using the sudo command.
26. chown: Changes file and directory ownership
In Linux, every file is owned by a user and a group. You can always change who owns the file by using the chown command. You can use chown <user>:<group> <filename> to set file ownership.
For instance, web servers need to own website files to serve them properly.
chown -R www-data:www-data /var/www/html/
This command is helpful if you are uploading files via FTP. These files can come in with the wrong ownership, and you can use chown to change that.
27. ssh-keygen: Generates SSH key pairs for secure authentication
SSH keys are much more secure than passwords for server access. The SSH key sits on your computer without ever being sent to the server, so a hacker watching your network will never see the key that helped you log in.
Running “ssh-keygen -t rsa -b 4096” creates public and private key files.
ssh-keygen -t rsa -b 4096 -C “your@email.com”
This creates a “4096-bit RSA” key pair. Copy the public key to servers for passwordless authentication and automated deployments.
28. ufw: Ubuntu’s uncomplicated Firewall for basic server protection
Every server needs a good firewall setup. Most Linux servers come with the ufw firewall, or it can be easily installed.
Once you have it, run the ufw enable command to activate the firewall, then ufw allow <port> to permit specific services through the firewall.
ufw enableufw allow 22ufw allow 80ufw allow 443
This allows SSH (22), HTTP (80), and HTTPS (443) traffic while blocking everything else, providing basic but effective server protection.
Expert Level: Commands for Automation and Scale
These commands help you with automation and advanced system administration for managing websites at scale.

Service Management
29. systemctl: Controls systemd services on modern Linux distributions
Use systemctl <action> <service> to manage system services. Common actions include start, stop, restart, enable, disable, and status.
systemctl status nginxsystemctl restart mysql
The first command shows detailed NGINX status including recent log entries. The second restarts your database server to apply any configuration changes you might have made to the “mysql” configuration.
30. crontab: Schedules automated tasks to run at specific times
You don’t want to wake up in the middle of the night to run server commands. Cron jobs can do that for you.
To edit your personal cron table, run crontab -e and you’ll see all your existing cron entries.
Tasks are specified using the format: minute, hour, day, month, weekday, and command.
0 2 * * * /usr/local/bin/backup-website.sh
For instance, the above cron job runs a backup script (“backup-website.sh”) daily at 2 a.m.
You can use cron jobs for automated backups, log rotation, and maintenance tasks and so much more in your production environments.
Advanced Text Processing
31. sed: Stream editor for filtering and transforming text
Use sed ‘s/old/new/g’ <filename> to replace text in files. Add “-i” to edit files directly instead of just displaying results.
sed -i ‘s/old_database/new_database/g’ /var/www/html/wp-config.php
This replaces all occurrences of “old_database” with “new_database” in your WordPress config file; useful for database migrations.
32. awk: Pattern scanning and data extraction tool
Running awk ‘{print $1}’ <filename> extracts the first field (column) from each line. Excellent for processing log files and structured data.
awk ‘{print $1}’ /var/log/nginx/access.log | sort | uniq -c | sort -nr | head -10
This extracts IP addresses from access logs, counts them, and shows the top 10 visitors to your website.
Real-World Application Scenarios
Let’s have a quick review, and then put these commands together for common situations you’ll face managing your VPS.
When Your Website Loads Slowly
Start by checking what’s consuming your server resources.
Run top or htop to see which processes are using the most CPU and memory. You’re looking for any processes consuming over 50% of your resources and if any of them can be killed.
If resource usage looks normal, check your available disk space with “df -h.” If you notice usage exceeding 90% on any filesystem, free up space as soon as possible. Everything drastically slows down when your server is full.
Next, verify your web server is actually running properly.
Use ps aux | grep nginx (or ps aux | grep apache if you’re using Apache) to confirm your web server processes are active and responding.
Check your error logs while testing your site.
Run tail -f /var/log/nginx/error.log in one terminal, then visit your website in a browser window. If there are any errors running your site, you should see them immediately appear in your terminal.
Finally, test your website’s response time directly from the server with curl -I https://yoursite.com. This bypasses any network issues and tells you exactly how long your server takes to respond.
Setting Up a Secure Development Environment
Create a dedicated user account for development work instead of using root for everything:
sudo adduser devuser
Set up a proper directory structure for your staging site. This keeps development files organized and separate from production:
mkdir -p /var/www/staging/{public,logs,backups}
Fix the ownership so your web server can access the files properly:
chown -R devuser:www-data /var/www/staging
Set appropriate permissions – 755 allows the owner to read/write/execute while giving others read and execute access:
chmod -R 755 /var/www/staging
Configure your firewall to allow only essential services. Start by allowing SSH so you don’t lock yourself out:
sudo ufw allow 22
Allow web traffic on the standard HTTP and HTTPS ports:
sudo ufw allow 80sudo ufw allow 443
Enable the firewall to start blocking unauthorized connections:
sudo ufw enable
Command Combinations That Show Real Proficiency
Advanced users combine commands to solve complex problems:
The below command finds nginx processes, extracts their PIDs, and kills them all in one line:
ps aux | grep nginx | awk ‘{print $2}’ | xargs kill -9
This find command automatically removes log files older than 7 days to free disk space:
find /var/log -name “*.log” -mtime +7 -delete
This combined du command shows the 5 largest directories in your web root, sorted by size:
du -sh /var/www/* | sort -hr | head -5
If you’re getting 404 errors, run this command to count them in your access log to identify broken links:
grep -c “404” /var/log/nginx/access.log
So, What Comes Next
Once you’re comfortable with these 30 commands, you’ll want a quality VPS provider that’s fast and flexible while providing complete control for your growing skills.
DreamHost’s VPS hosting offers just that. You get full root access to experiment safely, SSD storage that makes file operations lightning-fast, and scalable resources when your projects outgrow their current limits.
We also include automatic backups so you can experiment fearlessly, and our support team understands Linux environments when you need help with complex configurations.

VPS Hosting
Take Charge with Flexible VPS Hosting
Here’s how DreamHost’s VPS offering stands apart: 24/7 customer support, an intuitive panel, scalable RAM, unlimited bandwidth, unlimited hosting domains, and SSD storage.
Choose Your VPS Plan
Did you enjoy this article?

